 Part of AccuFund's Small Formulas – Big Impact Series: Donor Participation Ratings
HOW ESTABLISHING DONOR HISTORICAL DATA CAN LEAD TO INCREASED GIVING.
Who are your frequent donors?
Who are your major donors this year?
Who is close to moving into these categories?
How much has any one donor given in their lifetime?
A total sum of giving helps create a better picture of your donor. It helps you gauge the strength of a donor’s relationship to your organization. But, how easily can you access that information?
By establishing predefined segments in your database, it makes life easier at every checkpoint. From pulling mailing lists to adding appropriate tags, to automatically initiating thank you notes and personal phone calls, you can improve conversions and take them to a higher level of giving.
HERE IS THE DETAIL NEEDED TO MAKE THAT HAPPEN.
Categorizing Donors Based on Historical Giving Amounts and Frequencies
In this post, we are going to use a combination of fields such as Total Gifts, Total Number of Gifts, Last Gift, etc. to categorize our donors based on the amount and frequency they give to your organization.
In our example, we’re going to categorize our donors using the terms:
*Deceased Donor
*Major Donor
*Frequent Donor
*New Donor
*Lapsed Donor
*Standard Donor
*Non-Donor
Salesforce’s NPSP roll-up capabilities provide us with fields that show real time dates, counts, and currency amounts to summarize individuals’ giving trends. We’ll take a number of fields and assess their values to determine how to rate each individual based on the seven ratings above.
The definitions for the categories above can be defined by your team based on your fundraising structure and customized by the ability to change amounts, date ranges, or category names.
HERE ARE STEP-BY-STEP INSTRUCTIONS:
Step 1: Create a new Contact formula field. Your formula output will be Text. For this example, let’s name our field Donor Category.
Step 2: In our formula, we’ll use a series of If/Then statements to write logic that all donors in our database will fall within. This way, each Contact in our system will have a category for reporting, mailings, etc. Conceptually, the formula we are writing reads:
1. If the Contact Deceased checkbox equals True (is checked), return Deceased Donor as category,
2. If the Contact’s Total Gift Amount is greater than or equal to $10,000.00, return Major Donor as category,
3. If the Contact’s Total Number of Gifts is greater than or equal to 8, return Frequent Donor as category,
4. If the Contact’s First Gift Date is within 90 days (~ 3 months) of the current date, return New Donor as category,
5. If the Contact’s Last Gift Date is outside of 730 days (~ 2 years) from the current date, return Lapsed Donor as category
6. If the Contact’s Total Gift Amount is less than $10,000.00 AND greater than $0.00, return Standard Donor as category.
7. If the Contact does not meet any of the criteria above, return Non-Donor as category.
Formulas read from left to right just like we do, meaning the statements added first take priority over later statements.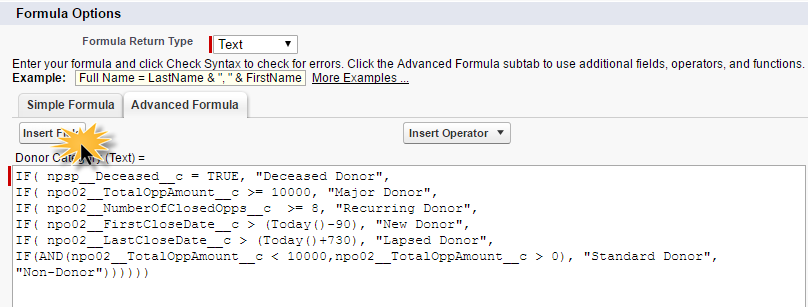
NOTE: Formulas only accept the API name of a field. To find the field you are using in this formula, click on the ‘Insert Field’ button and find your field in the right hand side list of Contact fields. The name of your field will vary from this example if you are using a custom roll-up field or another Nonprofit Starter Pack field to increase.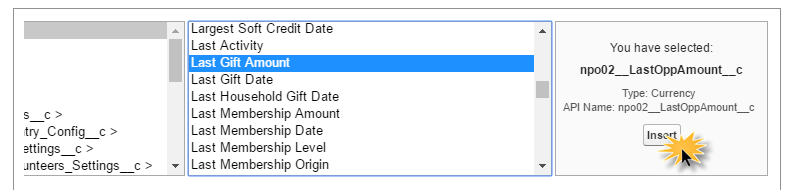
Step 3: Check the syntax of your formula field to ensure the formula has been written correctly. If there are no errors, save the new field and return to any contact record in your database.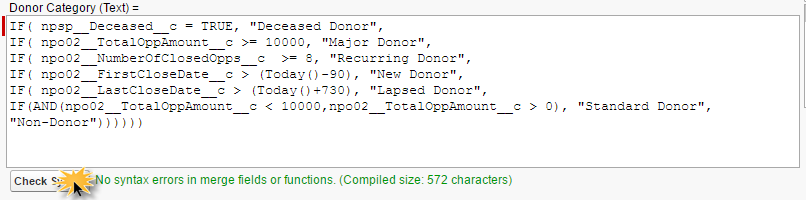
You can adjust the layout of the contact page to move your new field into a custom section with other fields from development processes.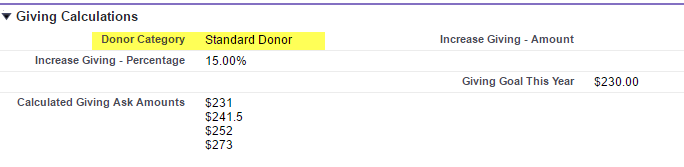
Now, looking at any contact record in your system, the Donor Category field will represent the giving trend for that specific person and give you quick insight as to what type of donor they are to your organization.
HELPFUL TIP.
COPY & PASTE:
IF( npsp__Deceased__c = TRUE, "Deceased Donor",
IF( npo02__TotalOppAmount__c >= 10000, "Major Donor",
IF( npo02__NumberOfClosedOpps__c >= 8, "Recurring Donor",
IF( npo02__FirstCloseDate__c > (Today()-90), "New Donor",
IF( npo02__LastCloseDate__c > (Today()+730), "Lapsed Donor",
IF(AND(npo02__TotalOppAmount__c < 10000,npo02__TotalOppAmount__c > 0), "Standard Donor",
"Non-Donor"))))))
RELATED BLOG ARTICLES:
Small Formulas – Big Impact: Automate Salesforce Database Giving
Part 2: Small Formulas – Big Impact. Setting Individual Giving Increases
Exponential Expectations – Automating Donations on Last Gift Amount with Salesforce
AccuFund provides a complete fund accounting financial management solution – available online or onsite – consisting of a strong core system and modules that allow you to expand as your needs evolve. It is known for its scalability, core function capabilities, reporting, integration and customer support. We enable organizations to streamline every aspect of their operations.
Technology advances coupled with AccuFund’s ongoing commitment to enhance its products has kept AccuFund at the forefront of fund accounting innovation. Through APIs, AccuFund solutions integrate with Salesforce for Nonprofits and other popular CRM systems to meet the unique needs of your organization; improving development, fundraising and management activities.